You can export H.264 vide from QuickTime Pro in a number of ways. The simplest way is to use the iPod preset. This is perfect for creating iPod compatible files, but it gives you no control over any of the settings. You may want to tweak the settings a bit to suit your podcast, in which case you'll have to create your own encoding setting.
Using the iPod presetUsing the iPod preset is simple:
1. Open QuickTime Pro, and open the video to be encoded.
2. Choose Export from the File menu. This opens the Export window, shown in Figure 1
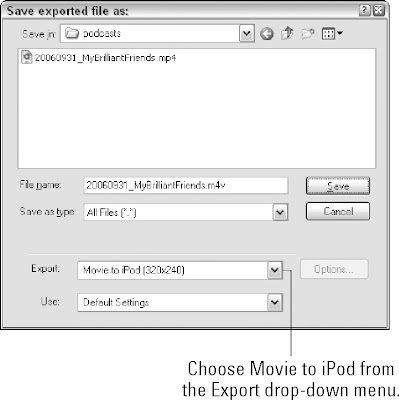 Figure 1: Export an iPod compatible video from QuickTime Pro using this preset.
 3. From the drop-down menu, choose Movie to iPod (320×240).
4. Click Save. QuickTime Pro exports an iPod compatible H.264 video.
The only problem with using this preset is that it doesn't give you any control over any of the encoding options. You can't select a bit rate, a resolution, or anything else. Of course, it's guaranteed to work on an iPod, which is pretty handy. But the default bit rate is rather high, clocking in at over 800 kbps. This is fine for a short podcast, but if your podcast is longer than, say, 5 minutes, you're looking at a pretty serious download. You may want to dial the bit rate down to reduce the file size. To do this, you have to set your encoding settings by hand.
Encoding using custom H.264 settingsQuickTime also makes it easy to customize the encoding settings. There are a few more steps than using the iPod preset, but you have far more control over the output. Follow these steps:
1. Open QuickTime Pro, and open the video to be encoded.
2. Choose Export from the File menu. Again, this opens the Export window, as shown in Figure 2.
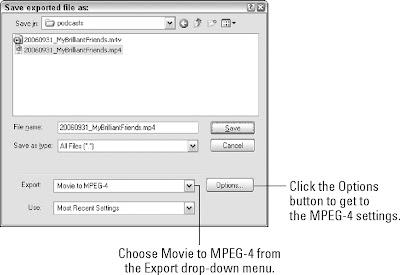 Figure 2: Here's how to get to the MPEG-4 video export settings.
 3. Choose Movie to MPEG-4 from the Export drop-down menu.
4. Click the Options button to get to the video export settings. To begin with, this opens the MPEG-4 video settings, as shown in Figure 3.
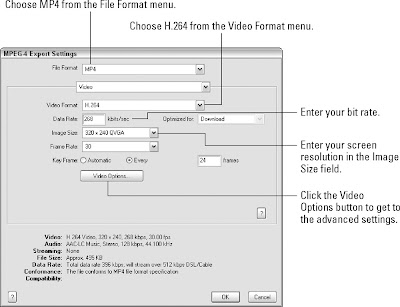 Figure 3: Configure QuickTime MPEG-4 export video settings with this dialog box.
 5. Select MP4 from the File Format drop-down menu.
Note QuickTime Pro defaults to MP4 (ISMA) for MPEG-4 output. ISMA stands for the Internet Streaming Media Alliance. Unfortunately the H.264 codec is not yet considered ISMA compliant (as of Fall 2006). This really doesn't mean anything. The H.264 codec is part of the MPEG-4 standard and will play back in any modern QuickTime player or iPod. For best quality, you should choose the MP4 option, not MP4(ISMA), so you can use the H.264 codec.
6. Choose H.264 from the Video Format drop-down menu.
7. Enter a bit rate for your file. Remember that the total bit rate is the video bit rate plus the audio bit rate.
8. Enter your screen resolution in the Image Size field. If you want iPod compatible files, choose 320×240.
9. Click the Video Options button to access the advanced encoding options. This opens the Advanced Video Settings window, shown in Figure 4.
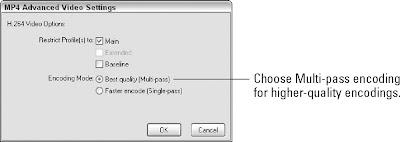 Figure 4: Be sure to select Multi-pass encoding for the highest-quality results.
 10. Choose Best Quality (Multi-pass) encoding mode, and click OK.
Note You may be wondering about the profiles restriction (Main versus Baseline) on this screen. In MPEG-4 encoding profiles define the "tools" that can be used to encode the video. Consequently these profiles also define the tools required to play back the encoded video. In this example, the Main profile provides more encoding tools than the Base profile. Since our goal is the highest quality video, we chose the Main profile.
The MPEG-4 standard is incredibly broad and frankly, not written in a way that a layman can understand. For a fantastic, concise, and fun-to-read explanation of the MPEG-4 standard, we recommend Damian Stolarz' Mastering Internet Video.
11. Now it's time to configure the settings for your audio. Select Audio from the second dropdown menu in the MPEG-4 Export Settings window. This changes the information displayed in the bottom half of the window from video settings to audio settings, as shown in Figure 5.
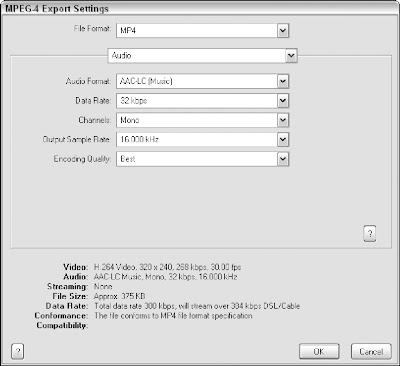 Figure 5: Configuring QuickTime MPEG-4 export audio settings
 12. The first thing to choose is the audio codec you want to use from the Audio Format dropdown menu. In fact, the only codec offered for MPEG-4 encoding is AAC, which is just fine, because it offers great quality.
13. Next, select the desired bit rate from the Data Rate drop-down menu. A rate of 32 kbps should provide good quality.
14. If you're encoding spoken word content or want slightly higher fidelity, choose mono from the Channels drop-down menu.
15. The next available setting is the Output Sample Rate. This determines how much highfrequency information is contained in the final encoding. In general, the default setting works just fine. However, you can experiment with lowering the setting to get increased fidelity.
16. Finally, set your Encoding Quality to Best. This makes the encoding process take a little longer, but hey, your podcast is worth it.
17. Click OK to return to the Export menu, and then click Save to start the export/encoding process. You'll see the QuickTime Export progress window, shown in Figure 6, which gives you an idea how long the process will take. Depending on the length of your podcast, you may have time to grab a cup of coffee.
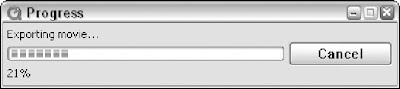 Figure 6: The QuickTime export progress window lets you know how long it's going to take.


