Jul 30, 2008

Advanced Video Production Techniques : Inserting Virtual Backgrounds Using Chroma Key

If you've ever wondered how your local weatherman manages to stand in front of huge swirling weather maps, the answer is using a technology known as chroma key (also called green screen or blue screen). The weatherman isn't actually standing in front of those pictures. He's standing in front of a blank wall painted a very bright, unnatural green. Then, using what until recently was incredibly expensive technology, the green background is removed from the video image and replaced with the graphics that you see on television. When the weatherman is looking off to the side, he's actually looking at a small television monitor to figure out where to point.

Nowadays, chroma key is built into many video-editing platforms. Some require an additional plugin, but others include it as part of the basic functionality. To use this feature, however, you have to film yourself (or whoever your subject is) in front of a green (or bright blue) wall. The trick is to make sure the wall color is very uniform and is lit in such a way that there are no shadows on the wall. You can buy custom paint that the professionals use to paint their chroma key walls, or if you're budget constrained, you can buy a roll of bright green butcher paper at your local art supply store.

You need a large area to film against, because you have to stand far enough away from the green screen so that you don't cast any shadows on it. Lighting for a green screen shoot is an art form in itself. This is a good example of where calling in a professional to help you out is a great idea. After you've got a lighting setup established, you can reuse it for future shoots.

After you've shot your video against the green screen, the process for substituting the background depends on your video-editing software. Figure 1 illustrates the chroma key effect from Vegas. After you've specified what color to use as the key for the chroma key effect, that color is removed from the frame and another image or video is substituted where the key was.


Figure 1: Vegas chroma key effect


Tip One good reason to use chroma key is that the backgrounds are generally static, and as we'll find out later, static backgrounds encode best. Conversely, don't use backgrounds with motion in them if they can be avoided.


Most video-editing programs deal with video in terms of tracks, so when the chroma key effect is used, the video track beneath the main track is revealed. This is how the weatherman appears to be standing in front of the weather maps. In actuality, the weather maps are just showing through where the original chroma key color was.

Jul 18, 2008

Cropping and Resizing

At some point, you may want to cut out part of your video image. For example, the original video may not have been framed well, and you may want a tighter shot. Or there may be something objectionable in the shot that you want to remove. Cutting out this unwanted video is called cropping. If you're targeting video iPods, you also have to resize your video to 320×240, which is the resolution of the iPod video screen. Video-editing platforms allow you to do this, but in order to do it correctly without introducing any visual distortion, you must understand what an aspect ratio is.

Aspect ratios
The aspect ratio is the ratio of the width to the height of a video image. Standard definition television has an aspect ratio of 4:3 (or 1.33:1). High definition TV has an aspect ratio of 16:9 (1.78:1). You've no doubt noticed that all the new HDTV-compatible screens are wider than standard TVs. When you're cropping and resizing video, it's critical to maintain your aspect ratio; otherwise, you'll stretch the video in one direction or another.

To better understand this, let's look at how NTSC video is digitized. The original signal is displayed on 486 lines. Each one of these lines, or rasters, is a "stripe" of continuous video information. When it is digitized, it is divided up into 720 discrete slices, each one of these slices is assigned a value, and the values are stored digitally.

However, when you display the digitized 720×486 video on a computer monitor, the video appears slightly wider than on a television, or looked at another way, the video seems a bit squished. People look a little shorter and stickier than usual, which in general is not a good thing. Why is this?

If you do the math, 720×486 is not a 4:3 aspect ratio. If you could zoom in and look really closely at the tiny slices of NTSC video that were digitized, they would be slightly taller than they are wide. But computer monitor pixels are square. So when 720×486 video is displayed on a computer monitor, it appears stretched horizontally. To make the video look right, you must resize the video to a 4:3 aspect ratio such as 640×480 or 320×240. This restores the original aspect ratio, and the image looks right.

Note Those of you paying attention may be wondering about standard definition television displayed on the new widescreen models. The simple answer is that most widescreen TVs stretch standard television out to fill the entire 16:9 screen, introducing ridiculous amounts of distortion. Why that is considered an improvement is anyone's guess.


With the availability of HDV cameras, some of you may be fortunate enough to be working in HDV, which offers a native widescreen format. If so, you'll be working with a 16:9 aspect ratio such as 1080×720 or 1920×1080. Regardless of the format you're working in, the key is to maintain your aspect ratio.

Cropping
If you decide you need to do some cropping, the key is to crop a little off each side to maintain your aspect ratio (see Figure 1). Some video-editing platforms offer to maintain the aspect ratio automatically when you're performing a crop, which is very handy. However, many of the encoding tools require that you manually specify the number of pixels you want shaved from the top, bottom, right, and left of your screen. If that's the case, then you have to do the math yourself and be sure to crop the right amounts from each side.


Figure 1: Be careful with your aspect ratio when you crop.


As an example, let's say that you needed to shave off the bottom edge of your video. You could estimate that you wanted to crop off the bottom 5 percent of your screen, which would mean 24 lines of video. Assuming you were working with broadcast video, to maintain your aspect ratio, you'd need to crop a total of:

24 * 720 / 486 = 35.5 or 36 pixels


So you'd need to cut 36 pixels off the width to maintain your aspect ratio. You could do this by taking 18 pixels off either side, or 36 pixels off one side. It doesn't matter; where you crop is dependent on what is in your video frame. Of course, this is assuming that you're working with NTSC video. The math varies slightly if you've already resized the video to a 4:3 aspect ratio such as 640×480.

One thing to bear in mind is that some codecs have limitations on the dimensions they can encode. Codecs divide the video frame into small boxes known as macroblocks. In some cases, the smallest macroblock allowed is 16×16 pixels, which means that your video dimensions must be divisible by 16. Most modern codecs allow macroblocks to be 8×8 pixels, or even 4×4 pixels. The great thing about 320×240 is that it works for even the largest macroblocks.

Resizing
Resizing is pretty easy; just make sure you're resizing to the correct aspect ratio.

Jul 8, 2008

Video Signal Processing : Using deinterlacing filters

You should have an understanding about why you'd want to do some video signal processing. Even if you've done a great job producing and capturing your video, there are still fundamental differences between television and computer monitor displays that should be compensated for. To do this, you need to de-interlace your video and adjust your color for RGB monitors.

Using de-interlacing filters

Most editing platforms have de-interlacing filters built into them. As we saw in Figure 10.1, the problem is dealing with the artifacts that arise when two fields of interlaced video are combined to make a single frame of progressive video. Three methods are commonly used to deal with interlaced video:

  • Blending: This approach combines the two fields, but it's vulnerable to interlacing artifacts, as shown in Figure 10.1.

  • Interpolation: This approach attempts to shift parts of one field left or right to compensate for the artifacts. This is very computationally complex, because only parts of the field should be interpolated. For example, in Figure 10.1, we want to interpolate the parts of the frame that include the moving minivan, but not those that contain static elements such as the trees in the background.

  • Discarding: This approach discards one field and uses a single field twice in a single frame of progressive video. The resulting frame therefore has half the vertical resolution of the original frame, but without the interlacing artifacts.

  • Editing and encoding platforms distinguish themselves by how they deal with interlacing artifacts. De-interlacing video on two different platforms generally yields different quality results. Where you choose to do your de-interlacing depends on where you can get the best quality. If you're staying in the broadcast world for your editing phase, it makes more sense to de-interlace during the encoding phase. This is demonstrated for you in the next section.

    However, we have to come clean about de-interlacing. For the most part, it isn't necessary for most podcasts. If you're encoding your podcasts for viewing on a video iPod (or other portable media device), chances are good that you're targeting a resolution of 320×240. At this resolution, most encoding software drops the second field by default! If you've got only 320 lines of resolution, it doesn't make sense to process the second field, so you don't have any interlacing artifacts to deal with. This is a very good reason to target 320×240 for your podcasts: The de-interlacing problem goes away.

    If, however, you're targeting browser-based playback for your podcast and decide to use a resolution larger than 320×240 — such as 400×300, 480×360, or 640×480 — you need to de-interlace your video during the encoding phase. So, for you mavericks, the next section shows where to find the de-interlacing filter in a number of software applications.

    Where to find de-interlacing filters
    If you're hoping to de-interlace your video (assuming that your final video podcast resolution is larger than 320×240), you need to make sure your encoding application has de-interlacing filters. Most, but not all, do. If you're targeting the QuickTime format, use an encoding application such as Sorenson Squeeze, because QuickTime Pro doesn't include a de-interlacing filter.

    Sorenson Squeeze includes a de-interlacing filter in the filter settings window, shown in Figure 1. Double-click any filter to open the filter settings window. The de-interlacing filter is on by default in the preset filters.

    Figure 1: Sorenson Squeeze offers de-interlacing in the filter settings window.


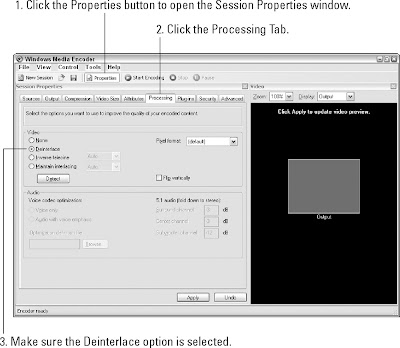
    If you're targeting the Windows Media Format, you can use the de-interlacing filter included in the Windows Media Encoder. The de-interlacing filter is on the Processing tab of the Session Properties window, shown in Figure 2.


    Figure 2: The Windows Media Encoder offers a de-interlacing filter in the processing settings.


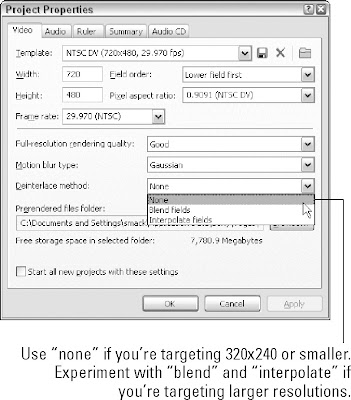
    If your encoding application doesn't have a de-interlacing filter, chances are good that your editing platform will. Vegas includes the de-interlace setting in the Project Properties window, shown in Figure 3. Select Project Properties from the File menu or type Alt+Enter, and then select the deinterlacing method you want from the drop-down menu.


    Figure 3: Vegas offers a de-interlacing filter in the project properties window.

    Jul 5, 2008

    Display Technology Differences

    Television screens display images using a completely different technology than computer monitors. This is unfortunate because it leads to problems when trying to display video on a computer screen. However, it also can be a blessing, because television technology is nearly 100 years old, and much better technology is now available. The problem is that for the foreseeable future, we're caught between the two, shooting with cameras that are designed to record video in the NTSC/PAL (television) standard, and distributing our video on the Internet to be viewed on modern displays.

    Interlaced versus progressive displays
    Each frame of video is divided into two fields, one consisting of the odd lines of the image and the other the even lines. These two fields are scanned and displayed in series. So television actually is 60 fields per second, which we see as continual motion.

    Computer monitors, whether they're cathode ray tube (CRT) or liquid crystal display (LCD), are progressive monitors. Each frame of video is drawn from left to right, top to bottom. There are no fields. The problems appear when we try to create a single frame of progressive video from two fields of interlaced video (see Figure 1).


    Figure 1: Converting two fields of interlaced video with significant horizontal motion to a single frame of progressive video can be problematic.


    In Figure 1, a minivan is driving past the camera. During the split second between the first and second field scans, the minivan has moved across the frame. When this video is displayed on an interlaced display, it appears normal, because the second field is displayed a split second after the first. However, if we try to combine these two fields of interlaced video into a single progressive frame, interlacing artifacts appear because of the horizontal motion. The front edge of the minivan is "feathered," and both tires are a blur. At either the editing or the encoding phase, something must be done to deal with this problem.

    Color spaces
    Television and computer monitors encode color information differently. Television signals are encoded in terms of luminance and chrominance (YUV encoding); computer monitor signals are encoded in terms of the amount of red, blue, and green in each pixel (RGB encoding). We also watch them in different environments. Televisions are generally viewed in somewhat dim surroundings, whereas computer monitors are generally in bright areas. The combination of these factors means that content created for one environment doesn't look right when displayed on the other.

    Digitized NTSC video looks dull and washed out when displayed on a computer monitor. Video that has been processed to look right on a computer monitor looks too bright and saturated (colorful) when displayed on an NTSC monitor. The non-compatibility between the two display technologies makes it problematic to create high-quality video, particularly if you want to display your content on both. If you're producing content for both broadcast and the Internet, at some point your project must split into two separate projects. After you start processing a video signal for display on a computer monitor, you won't be able to display it on a TV monitor.

    Tip The best way to manage this issue is to work exclusively in the broadcast space during your digitizing and editing phases. Archive your masters in a broadcast format. Don't do your post-processing for Internet viewing until the encoding phase, or at least after all your editing has been done and you have a broadcast-quality master. That way, you always have a version of your video that can be broadcast or burned to DVD. Create a special version that is intended for Internet-only consumption. As new formats evolve, you can always re-encode from your broadcast-quality master.

    Jul 2, 2008

    Advanced Video Production Techniques

    So you've figured out how to shoot some video and managed to load it into your computer. It looks good, but something's not quite right. The video just isn't quite as bright and colorful as you remember. That's because there are fundamental differences between televisions and computer monitors.

    Before we dive into the technical minutiae of display technologies, let's talk briefly about some simple tools you can use to improve your video image before it hits tape. Lens filters can be a very cost-effective way of improving your video quality.

    Understanding Lens Filters


    Many of you may have at one time or another played around with photography. If you ever progressed beyond "point-and-shoot" cameras, one of the first accessories you probably purchased was an ultraviolet (UV) filter for your lens. UV filters are useful because they prevent UV light from entering your lens, which can make your pictures look slightly blurry, and because they protect your lens. Mistakenly scratching a $25 filter is far preferable to scratching a fancy zoom lens that cost you hundreds of dollars.

    The same applies for your DV camera. Protecting your investment by buying a cheap and replaceable filter is a good idea, and as with photography, filtering out UV light gives you a cleaner video image. If you're wondering how a UV filter works, chances are good that you've experienced it many times. Every time you put on a pair of sunglasses, you're filtering out UV light (among other things). The immediate effect is a clearer, crisper image. Even though we can't see UV light, it interferes with our ability to perceive visible light. DV cameras have the same problem, so a UV filter is always a good idea.

    A number of other lens filters can be used to improve the quality of your podcast. The next few sections discuss them generally. To learn more about exactly which filter you should use with your model of camera, you should consult online discussion boards and digital video camera review sites.

    Diffusion
    Diffusion filters soften your video image. We've all seen diffusion at work in the movies, particularly in the film noir genre. The camera cuts to a shot of the gorgeous female actress, and she's practically luminous. This is achieved using a fairly heavy diffusion filter. Although this would be overkill for most podcasting applications, using a light diffusion filter gives your podcast a distinctive look. It also can help your encoding quality.

    Many DV cameras default to shooting a very high contrast image, and some even use special processing to exaggerate the edges between objects. This can be okay in situations where there isn't much contrast to begin with, but if your scene is lit properly, you should have plenty of contrast. Video that has too much contrast looks amateurish. Using a diffusion filter can mitigate this by softening the entire image ever so slightly. Diffusion filters can make your podcast look more "filmlike," which is generally desirable.

    Video with too much contrast also is more difficult to encode, because it has lots of extra detail in the frame. This makes the encoder's job harder, because it tries to maintain as much detail as possible. Using a diffusion filter helps soften the image slightly, which reduces the amount of detail, thereby making the image easier to encode.

    Color correction
    The UV filter described at the beginning of this section is essentially a color filter, designed to filter out colors beyond our range of vision. There are many more color filters that you can buy for other situations. One of the most useful for many podcasters is the fluorescent light filter. Fluorescent lights emit a very particular type of light, with a lot of extra green in it. Because of the large amount of green content, fluorescent lights tend to make people look slightly ill. Using a fluorescent filter when filming in offices or other fluorescent lighting situations can make your podcasts look warmer and more natural.

    You also can buy filters that are designed to enhance certain parts of the color spectrum. These are fairly specialized and not for the average podcast producer. If you're looking for a special effect, you're probably better off trying things out in your video-editing platform, where you can safely undo those mistakes.

    Polarization
    Polarization filters are used to filter out reflected light. For example, filming through a window can be very difficult because of the reflections. Using a polarization filter removes this reflected light and allows you to film what's on the other side of the glass. Similarly, if you're trying to film under water, for example fish in a pond, you need a polarization filter. Polarization is often used in sunglasses for this reason.