Jun 28, 2008

Archiving Your Podcast

As you probably are beginning to realize, quite a bit of work goes into creating a video podcast. If you've got a FireWire setup, it can be pretty simple, but if you're using a video capture card and an analog camera, you may have to fiddle with your settings. Depending on how much editing you do (and how many cutaways you have to use), your final master may be quite a bit different from what you originally started off with. It's very important, therefore, that you archive your work so that you don't have to start from scratch if you decide to re-edit your podcast, perhaps for a "bestof" end-of-year show.

For that matter, your podcast may not be the only outlet for your programming. You may decide you want to put out a DVD or license your programming to a cable channel. The possibilities are all out there, but if all you keep lying around are the low-bit-rate podcast versions, you'd have to do lots of work to recreate your masters.

Save your work in as high a quality as you can. If you're working with a FireWire system, you can usually print your master right back to a DV tape. You can obviously keep a DV version on your hard drive if you've got space, but video files can fill up a hard drive quickly. DV tapes are compact and a fairly reliable backup method.

If you're not working with a FireWire system, or if you just want to keep pure digital copies lying around, consider buying an external hard drive (or two). You can use one to do all your capturing and editing and keep the other for archival purposes. Without the luxury of FireWire, you won't be able to save to DV, because video capture cards don't work in reverse; you can't print your edited master back to tape. You have to rely on digital storage.

One thing that hasn't been thoroughly established is how long hard drives will last. It's fairly common knowledge that hard drives in servers that are working 24 hours in a day have an average life expectancy of about three years. However, they're usually higher quality drives than most people have in their laptops or home desktop systems. Much like light bulbs, it's the turning on and turning off that are hardest on the drive.

If you're using external drives, you may not be using them every day, which in theory extends their life cycle, but if you put them on a shelf and forget about them, had drives have been known to "freeze." The data on the disc platters is intact, but the hard drive is unable to spin the platters to access the data. You can send drives in this condition to companies that specialize in data rescue, but the process is very expensive.

Unfortunately, we have no good answer as to how long hard drives are going to last. Institutions such as banks that rely on data use tape backup systems to maintain their data integrity. A number of pro-sumer tape backup formats are available nowadays. They're not cheap, but if you want a guarantee that your programs will be available 5, 10, or 25 years from now, you should consider investing in a good tape backup system, or open up an account with a backup company.

Jun 24, 2008

Tips : Editing Your Podcast

After you've transferred your video to your computer, you need to tidy up the rough edges of your video production and turn your podcast into a masterpiece. Well, we can hope, can't we? You should edit with an eye on three things: content, quality, and convenience.

First and foremost, you want your podcast to have good content from start to finish. If you are interviewing a guest for your podcast, you probably had a long list of questions to ask. When you're reviewing your footage, try to keep your distance from the material, and only keep what works best. Of course, some guests may be fantastic, and you'll want to keep every syllable they utter. Often, however, you'll find that a few questions just didn't go anywhere or didn't reveal anything new (see the "Ask the Right Questions" side bar). If so, edit it out. With a few nimble edits, the pacing of a show can change dramatically, turning a mediocre show into a great show.

Keep edits short and sharp
When you're editing, most edit platforms offer a number of transition options for you to choose from. In general, anything other than a quick cross fade (also known as a dissolve) should be avoided, for a couple of key reasons. First, if you watch closely, crazy transitions are almost never used on television or in film. Over-the-top transitions detract from the story line and call way too much attention to themselves. For this reason, they're a dead giveaway that an amateur is at the controls. Second, there's a technological reason why you shouldn't use complicated transitions. They are incredibly difficult to encode. If you're encoding for a broadband audience, the bit rates you use simply aren't capable of encoding that much motion efficiently. You'll either end up with a transition that looks like mud, or you'll be forced to encode your podcast at a higher bit rate, which means a larger file, a longer download for your audience, and a bigger bandwidth bill at the end of the month.

Cutaways
Cutaways are small pieces of film that you can use when editing video, often used to cover up an edit. Editing video can be tricky because people can see when and where you edit your video. You can't just cut out the middle of an interview without some clever editing, or people will notice that there's something missing. This is where cutaways can really help.

Imagine an interview on a conference floor, where someone rudely interrupts your guest while she's answering a question. Unless the interruption was by someone important (or it was really funny), you probably want to edit it out of the podcast. If you just cut it out, there will be a sudden jump in the video (known as a "jump cut" in the industry). You have to disguise your cut using a cutaway.

Here's how it works: When the interruption occurs, cut to some b-roll, like a shot of you nodding in agreement or a shot of the conference room floor. Let the audio of your guest's response continue to play underneath the b-roll. Then, you can cut from the b-roll with the guest audio underneath it to an appropriate location after the interruption occurred. The jump cut will be hidden by the b-roll, and your secret will be safe. This editing approach is illustrated in Figure 1.


Figure 1: Use cutaways to disguise your edits.


Tip Provided you have plenty of cutaway material, it's often easiest to edit your story together by editing to your audio and then covering any awkward transitions with cutaway or B-roll material.

Jun 20, 2008

Video capture cards

If you have no way to utilize FireWire, you have to use a video capture card to convert the analog video signal into digital information. Video capture cards, like cameras, are available at a wide range of price points. The more you spend, the higher quality your video capture will be.

Video capture card settings
Using a video capture card involves connecting your camera to the capture card and then specifying the settings for your capture. Where and what settings you can specify depends on your capture card and your video-editing platform. Essentially, you specify the following:

Resolution: The dimensions of your screen capture

Frame rate: How many frames per second to capture

Data rate (or compression): Whether to capture the video uncompressed or use a codec during capture


You also may be able to adjust the video settings for your capture, such as brightness, contrast, and saturation. However, the adjustments offered by most budget capture cards tend to be fairly coarse. A better approach is to digitize your video as purely as possible and to do your adjustments using video-editing software, which enables a much finer degree of control — and the ability to "undo."

To capture the highest quality video possible, try to capture full screen, full frame rate, and uncompressed. You may have to scale back, however, depending on your hardware situation. Full-screen uncompressed capture is a very data intensive process, requiring a fast machine and lots of storage. If you have to scale back, start by trying to use a different encoding scheme such as YUV. If your machine still can't capture full frames reliably, you'll have to reduce your resolution, possibly to 1/2 size (320×240). This is a perfectly acceptable starting point for a video podcast, provided you can capture at full frame rate.

Digitizing via a capture card using SwiftCap: A step-by-step example
If you are capturing video via a capture card, you can choose some settings. Most video-editing platforms come with a video capture application that allows you to access your video capture card and adjust your settings. In this example, we'll use SwiftCap, which is the video capture application that comes with all cards sold by Viewcast, one of the more popular video capture card manufacturers. It has some nifty features that you'll find handy for successful video captures.

Follow these steps to digitize video with SwiftCap:

1. Make sure that your capture card is installed correctly and that your camera or videotape deck is connected to your capture card.

2. Open SwiftCap. Provided your camera is running, you should see a preview of your video (see Figure 1). If you don't see a video preview, make sure "Preview Video" is checked on the View menu.


Figure 2: The ViewCast SwiftCap application


3. If you're still not seeing video, make sure your video source is correct. Many video capture cards have multiple inputs, for example, a composite input and an S-Video input. To check your source setting, choose "Capture Settings" from the Settings menu or click the capture settings icon (see Figure 2).

4. Select the appropriate source from the drop-down Source menu on the left side of the Capture Settings window (see Figure 3).


Figure 3: Select the appropriate source in the Capture Settings window to make the preview active.


5. Before you do any capturing, make sure your system is capable of capturing the screen resolution and encoding scheme you want to use. Ideally, you want to capture full screen (720×486, or 640×480 if your capture card automatically scales the input), but this requires a fast computer and plenty of storage. SwiftCap includes a handy disk performance analyzer that can save you lots of woe. From the Tools menu, choose "Disk Performance." This brings up the Disk Analyzer shown in Figure 4.


Figure 4: Click "Profile Drive" in the Disk Analyzer window to analyze your hard drive performance.


6. Select the drive you intend to capture to in the Local Drives pane, and click the "Profile Drive" button. The analyzer then determines the speed at which you can capture video and displays the results in the lower right. You can see in Figure 4 that this drive is capable of capturing only 20.8 frames per second using RGB 32 encoding. We'll have to choose a different encoding scheme to get the full frame rate.

Tip You should always capture video to a drive other than the system drive if possible.


7. The idea is that you have to get your frame rate comfortably over 30 frames per second. YUV encoding is more efficient, so you can usually get your frame rate up considerably by switching to a YUV encoding scheme. In Figure 5, you can see that switching to YUY2 puts our potential frame rate over 40, which is far more than we need.


Figure 5: Using a YUV encoding scheme is more efficient and allows higher frame rate captures.


8. After you've found settings that work with your system, go back to the Capture Settings window and enter those settings (see Figure 6).


Figure 6: Be sure to choose the right settings in the Capture Settings window.

9. Next, specify which drive you want the captured file saved to. Select "Capture Destination" from the Settings menu, or click the capture settings icon to bring up the Capture Destination window (see Figure 7). Clicking the double arrow button at the top right opens a browse window where you can specify a location and a filename. Be sure to use the same drive that you tested in Step 5.


Figure 7: Specify where to put your captured video file.


10. You should now be ready to capture video. Rewind the tape to just before where you want to start capturing, start tape playback, and then start the capture process by selecting "Start" from the Capture menu or by clicking the start capture icon.

11. SwiftCap disables the video preview during capture, so you have to either monitor via your camera's monitor or an external monitor. When you've captured what you needed, choose "Stop" from the capture menu or click the stop capture icon.

12. After you stop your capture, SwiftCap displays a capture results window. It is critical that your capture have zero dropped frames. If your capture dropped frames, you should recapture your video using a different encoding scheme or a smaller capture resolution.


That should be it. Using a capture card requires a few more steps than using a FireWire setup, but you should be able to get equally good quality, provided you're using a good quality capture card.

Jun 17, 2008

FireWire & setting it

By far the easiest method of capturing video is via FireWire. FireWire (officially known as IEEE 1394, and also known as iLink) is a standard by which data can be exchanged at very high speeds using a special cable and a FireWire port. Most digital video (DV) format cameras include a FireWire port. In addition to data transfer, the FireWire standard includes the ability to control remote devices (such as a camera). This makes capturing video from your DV camera a snap.

Simply connect the camera to your FireWire port, and open your video-editing platform. Most video-editing platforms include some sort of built-in "import" or "capture" functionality. You can generally control the camera from within the application and specify what part of the tape you want to capture. If you want to capture the whole tape, just rewind and hit the capture button.

If your computer doesn't have a FireWire port built in, you can buy a FireWire card for less than $50. If your camera doesn't have FireWire built in, you can buy a digital video converter. Digital video converters take analog audio and video inputs, for example from your camera, and create a DV signal that is available on the FireWire port. An added benefit of digital video converters is that they work both ways, meaning you can send the output of your video editor to the FireWire port, and the digital video converter converts it back to an analog signal that can be displayed on a monitor for quality-assurance purposes.

FireWire settings
One of the advantages (some might say disadvantages) of digitizing via FireWire is that there really are no settings for you to adjust. The DV standard is hard-coded into the entire process. You'll always be capturing full screen, full frame rate, using the DV codec.

The DV codec is another advantage to capturing via FireWire. Digital Video (DV) is compressed as it is recorded, making DV files about 1/5 the size of uncompressed video files. This makes them easier to store and move around. The compression affects image quality, however, and is one of the reasons that DV isn't considered true broadcast quality. However, the ease of use and the price points of DV cameras are virtually impossible to argue with.

Capturing via FireWire isn't really capturing in the truest sense; it's really just transferring the file from your camera (or tape deck) to your computer, just like you'd transfer a file from one computer to another. Because it's just a file transfer process, the video on your computer is an exact copy of the information on your camera.

Transferring files via FireWire using iMovie: A step-by-step example
Like so many things in the MacOS world, transferring DV from your camera to your Mac is a snap. Follow these steps:

1. First, connect your camera to your Mac's FireWire port, and turn your camera on to the playback or VCR position.

2. Open iMovie.

3. iMovie automatically detects that you have a camera connected and opens in "camera mode" (see Figure 1).


Figure 1: iMovie automatically detects a camera connected to your Mac and opens in camera mode.


Tip In camera mode, the stop, play, fast forward, and rewind buttons control your camera. You can use these controls to find the portion of your tape that you want to import.


4. To begin the import process, click the Import button (or hit the spacebar). If the tape is already playing, iMovie starts importing video from that point. If the tape is stopped, iMovie starts tape playback and begins importing.

5. iMovie automatically breaks up the imported video into clips each time it senses a new scene. This can be very handy, but it also can be a problem if you're trying to import a pre-edited piece of video with multiple scenes. You can disable this feature. From the iMovie menu, select Preferences (or just hold down the Apple button and push the comma key). Select the Import tab, and then deselect the "Start a new clip at each scene break" option.


That's it! You can now drag your clips to your iMovie timeline and edit away.

Jun 15, 2008

Digital video : Podcasting

To convert analog video into a digital format, the process is similar to digitizing audio. The incoming analog signal is sampled at discrete intervals, and the values are stored. Each sample is called a picture element, or pixel. To faithfully represent all the information in the video signal, it was determined that each line would be sampled 720 times. Combine this with the 480 visible lines, and you end up with a screen resolution of 720×480.

When we're digitizing video, we're storing values for each and every one of the pixels, of which there are quite a few:

720 * 480 = 345,600 pixels


Multiply that by 30 frames per second, and we're looking at over ten million values that have to be stored every second. For each one of these values, we have to allot a certain number of bits to store the value. Even if we try to limit the number of bits we use to store each value, we'll still end up with a very large file. We'll find later that this becomes even more of an issue when we're encoding for a podcast. In order to send files over the Internet, we must reduce them to a manageable size, and doing so with video requires some compromises.

One of the main compromises that can be made is the encoding scheme used to assign values to each pixel. You can assign this value in a number of different ways. Because all colors can be made out of red, green, and blue, one approach measures how much of each color is present in a pixel and then assigns a value accordingly. This is known as RGB encoding, which is the default method used on computer monitors. Different types of RGB encoding are named according to how many bits are used for the value, such as RGB 24 and RGB 32. RGB encoding can be very high quality, but it isn't the most efficient way to encode video information.

We learned that our eyes perceive light as being composed of luminance (brightness) and chrominance (color content). Our eyes are very sensitive to brightness and not so sensitive to color. Encoding luminance and chrominance information is a much more efficient way of encoding, because the color information can be compressed, and we won't notice the difference. We can get the same video quality, but with a lower data rate. Table 1 illustrates the bit rates and files sizes of some common video encoding schemes.


When digitizing, the best approach is to capture at the highest possibly quality. Starting with the highest possible quality gives you more flexibility during the editing phase and provides better raw material for your video podcast. However, the quality of your video capture may be limited by your equipment. If you're working with the DV format, it is encoded using the YUV encoding scheme and compressed at a 5:1 ratio. If you're trying to capture uncompressed video at full resolution (640×480 or above) you must have very fast hard drives and plenty of storage. Aim for the highest possible quality, and settle for whatever works within your limitations.

Jun 12, 2008

How video works

Many years ago, some clever folks discovered that they could exploit something known as persistence of vision to create the illusion of moving pictures ("movies"). When a series of still images is projected at a fast-enough rate, the human brain "fills in the blanks" and perceives the result as continuous motion. The threshold is approximately 20 frames per second. Anything faster appears to be continuous, and anything slower is perceived as discrete frames (or at least jerky motion).

Fast forward a few decades, and along comes television, which used the same theory, but instead of projecting light through film, television frames were electronic signals that could be broadcast long distances. To create a frame of video, the image is divided into horizontal lines, and each line is scanned inside a video camera and converted into an electronic signal. This electronic signal is broadcast and received by a television, which takes the electronic signal and shoots it at the television screen, line by line.

Of course, all this scanning and projecting happens very quickly. We need to view at least 20 frames per second to see continuous motion. With television, they had to choose a higher frame rate because the frames were drawn line by line, which took some time. Thirty frames per second was chosen as the standard, which was exactly half 60 cycles per second, the oscillating frequency of AC current in the United States.

But there was a problem. Early television technology was limited, and it was discovered that 30 frames per second appeared to flicker every so slightly. The obvious solution was to increase the frame rate, but technology at the time just couldn't handle a higher frame (and hence data) rate. Some sort of compromise had to be reached. The solution was interlacing.

Instead of sending 30 discrete frames per second, each frame of video is divided into two fields, one consisting of the odd numbered lines, the other of the even numbered lines. The fields are scanned alternately, odds and then evens, broadcast, and then projected onto the television screen (see Figure 1).


Figure 1: This figure shows how interlacing works.


Each frame of video contains two fields, which are broadcast at 60 fields per second. Because each field contains exactly half the data of the original frame, the data rate or bandwidth of the signal was the same as the original 30 frames per second non-interlaced signal. Interlacing solved the flicker problem, and thus a standard was born. The National Television Standards Committee (NTSC) standard was for 30 frames of interlaced video per second, divided into 525 lines of resolution, of which approximately 480 lines of resolution are visible. The remaining lines are known as the vertical blanking interval (VBI) and are used for synchronization (and later closed captions).

We'll see later that interlacing is no longer necessary using modern display technology. Computer monitors are not interlaced; they're known as progressive scan devices. For those of you interested in high definition television, this is why there are a plethora of standards in the HD world, both interlaced and progressive. Converting between the two display methods can create problems that we'll have to deal with later.

Jun 9, 2008

Recording for podcasting

If you've gotten this far, we hope you've invested some time and effort in lighting and composing your subject properly, and have your camera on a tripod, white-balanced and ready to go. Action! At long last, the camera is rolling. Or is it? Much like audio-only podcasts, you need to make sure everything is ready to go before you start recording.

What you never hear in the movies is the responses to the director as she yells out "Lights … camera …" When the director yells "lights," the director waits until she hears "lights ready" from the lighting director. After "camera," the director waits to hear "speed," which means that the camera is running. ("Speed" is a throwback to the days when it took a second or two for the camera to get up to speed.) If any extras or special effects need to be cranked up, they'll be cued before the director finally yells "and … action!"

You don't have to yell out loud, but you should develop a mental checklist that you run through every time you're about to start shooting video. Check to make sure all that your lights are on and that they haven't been bumped. Check all your audio equipment to make sure it's ready to go. Finally, press the record button on your camera, and give it a few seconds before you start your podcast production.

After the tape is running, take a deep breath, smile at the camera, and off you go. When you're finished taping, you may want to take a moment to make sure you've got enough footage for your podcast. You may want to shoot some extra footage, such as a special intro or outro, or some b-roll for safety's sake.

Intros and Outros
If you're having guests on your podcast, you may want to consider doing the intro and outro separately. In fact, you may have to record these separately if you've only got one camera and are recording the podcast interview-style (see the "Filming an Interview with a Single Camera" sidebar). It all depends on the type of podcast you're trying to put together and the level of professionalism you want to achieve.

B-roll
It's always a good idea when you're filming to film some extra content to use as b-roll. B-roll is footage that isn't part of the main story but can be inserted into your production from time to time for color or to cover tricky edits. For example, if you're doing a podcast on the latest gadgets at a conference, you should film plenty of b-roll of people demonstrating their gadgets, people milling around popular booths, people laughing, and anything else that helps convey the vibe of the event. You never know when this kind of material will come in handy.

Room tone
Video professionals always record some room tone either just before or after the taping session begins (usually at the end). They do this because sometimes a line or question has to be rerecorded, or overdubbed. For example, a question from the interviewer might be unintelligible or night need to be rephrased. It may be impossible, or too expensive, to re-tape the interview. Instead, you can cheat by overdubbing the question.

The overdubbing session generally takes place at a recording studio, not where the original footage was taped. When the overdubbed question replaces the original question, it is immediately noticeable because you can't hear the room tone of the original interview space. To compensate for this, you can mix in a little room tone, and your overdubbed question will sound as if it was asked during the original taping session.

Taping room tone is easy. Someone, usually the audio engineer, tells everyone to be quiet, and the cameras (and/or audio recording devices) record about 30 seconds of room tone. That's usually more than enough for later use. Be sure everyone who was in the room during the interview stays where they are, because if there are fewer (or more) people in the room when you record your room tone, it will sound slightly different from the room tone during the taping.

Jun 6, 2008

White balancing: A step-by-step example


White balancing: A step-by-step example

You need a decent-sized piece of white cardboard to perform white balancing. Follow these steps:

1. Have your talent hold the white cardboard directly in front of her, where all the lights are focused. If it's a tight shot, she may have to hold it in front of her face.

2. Zoom in until the white card fills the entire shot.

3. Find your camera's white balance control, set it to manual, and then set the white balance. Most cameras have a button to push or a menu option to select.

4. Zoom back out, and behold your wonderfully balanced picture.


When your lighting situation changes, you should rebalance the camera. This is particularly important if you're combining footage shot outdoors with footage shot indoors. If your white balance is off, people's flesh tones shift slightly, as do the colors of their clothing (if they're wearing the same color). If you're unsure whether you should white balance, do it just to be sure.

White-balancing tricks
You can use non-white cards when white balancing your camera for a special effect. Non-white balancing cards come in two flavors: warm cards and cool cards. The process is exactly the same as detailed previously, but by using a non-white card to white balance, you can trick the camera into thinking white is something different, and the result is slightly skewed colors in your video.

Why would you want to do this? Well, warm cards have a slightly blue tint, and when the camera compensates for this, the result is a slightly warmer image. This may be appropriate for a very intimate podcast shot indoors, if you want to make the viewer feel cozy. Cool cards have a slightly orange tint, so the resulting image is slightly blue. You've seen the effect in car commercials or computer commercials, where you get a very cool, impersonal look. This may be appropriate for a technology video podcast.

The best way to find out what warm and cool cards do is to play around with them. If you don't want to shell out the money for the professional versions, you can try white balancing with different shades of cardboard purchased at a local art supply store. But be careful; if you want a subtle effect, you want cards that are every so slightly off-white.

Exposure
After you set the white balance, you have to set the exposure. Many cameras have automatic exposure circuitry. However, much like the auto-focus mechanisms discussed in the preceding section, this feature often can be more trouble than it's worth.

Automatic exposure, sometimes called auto-iris, determines the exposure by the amount of light coming into the lens. The problem is that the amount of light, particularly outdoors, is continually changing. While it may seem like a good idea to adjust the exposure, it's distracting when the exposure changes in the middle of a scene.

Going back to the sailboat example in the preceding section, a sailboat with a big white sail coming into a scene dramatically changes the amount of light coming into the lens. To compensate, the camera changes the exposure by closing the iris slightly, and the exposure on your subject is compromised. It looks like a cloud has passed in front of the sun, when all that has happened is that the camera has changed the exposure.

Manual exposure is always a better choice if your camera offers it. Setting exposure properly should be done with an exposure meter. Setting exposure can be highly subjective, as videographers regularly overexpose or underexpose for dramatic effect. The procedure for setting exposure manually depends on your camera, the shutter speed, whether you're using filters or not, and a number of other things. You should, however, be able to set your exposure manually by "feel."

Look at your subject, particularly flesh tones if you're filming a person. Do they look right? Try opening your iris to increase your exposure, or closing it a bit to reduce the exposure. Look critically, and make sure you have what you need. If you're unsure, it's better to underexpose than overexpose. You can always add a bit of brightness during editing.

Easy on the pans, tilts, and zooming

Similarly, you should try to avoid panning (moving the camera from side to side), tilting (tilting the camera up or down), and zooming in on or out from your subject. First, these camera techniques are used sparingly by the pros, so if you use them too often or inappropriately, they're a dead giveaway that an amateur is behind the camera. Second, they place lots of motion in the video frame and consequently degrade the quality of your final product.

Jun 4, 2008

Camera Techniques

After you've taken some time to consider and light your subject, you're ready for the "camera" part of the "lights … camera … action" cliché. As mentioned earlier, your camera is probably the most important part of your video production chain, because if your camera doesn't faithfully render your perfectly lit scene, you're starting off with compromised quality, which propagates quality issues throughout your entire video podcast.

In many ways, shooting a video podcast should be no different than shooting for broadcast. You're trying to get the best shot, with plenty of light and color information and lots of detail. Not only does this look best when you're shooting, but it also makes for a better-looking podcast. However, you should take into account a number of things, because the Internet isn't quite ready for primetime, and podcasts are watched on computer screens and portable media players. Bearing this in mind, you should consider things like shot composition and what camera moves you have planned, because they have a direct affect on the quality of your podcast.

Shot composition
The most obvious thing to think about is shot composition. In most cases, your podcast will end up as a relatively small screen resolution, probably 320×240. An iPod screen measures about 2 inches wide by 1.5 inches tall. On a computer monitor, depending on how your resolution is set, this same resolution can be up to roughly 4 inches wide by 3 inches tall. Either way you look at it, it's not the largest screen in the world. Therefore, you probably want to do away with your long shots and concentrate on medium shots and close-ups.

Because podcasting tends to be a very personal medium, the most common video podcasts tend to concentrate on "head and shoulders" framing, where subjects' eyes are located about 1/3 of the way from the top of the screen. One common mistake that amateurs make is to frame the video subject in the center of the video. This makes the subject look short, with too much space above his head. The rule of thirds, shown in Figure 1, will suit you well.


Figure 1: Basic composition using the rule of thirds


To use the rule of thirds, divide your video image into thirds, both horizontally and vertically. You should try to place things of interest on the lines dividing the picture into thirds. Where the lines intersect are particularly good places. If you have a single subject, and you're shooting straight on, try to put the subject's eyes on the top 1/3 line. This makes for a well-balanced image that's pleasing to the eye. It doesn't matter how close or far away you are, the subject's eyes should remain on this line. If you get really close, you'll find that your shot crops off the top of his head (or maybe just his spiky hair). That's okay; if you place your subject at the center of the screen to try and keep his hair in the shot, it will look odd. Use the rule of thirds! It has been serving artists, photographers, and videographers for many years.

Another thing to consider is where the subject is looking. For a single talking head subject, it's best if they face directly towards the camera. In an interview situation, it's better if they are slightly to one side, looking toward where the other person is. In addition, it's most pleasing to the eye for the person to be angled toward the key light so that the part of the face getting the harsh light has the least exposure to the camera.

This may sound a bit complicated, but when you have your equipment set up it's easy to turn people one way or the other to see what effect it has on the shot. This is common practice in studios and is referred to as cheating. Sure, the subject may not be facing directly toward the interviewer, but if the shot looks better on camera, go with it.

Use a tripod
It is absolutely imperative to use a tripod when filming for the Web. Quite simply, using a tripod improves your video quality. Sure, most cameras come with built in handles that make them very portable, and carrying a tripod around is awkward and cumbersome. But the simple fact is that when you encode your podcast later, unnecessary motion will compromise your video quality, and hand-held content has lots of unnecessary motion.

Focus
It may seem obvious, particularly now that so many cameras have automatic focusing mechanisms built in, but it's critical that your subject remains in focus. Properly focused frames have more detail and consequently look better, even after encoding. Ironically, the auto-focus mechanisms of modern digital cameras can cause problems with your focus.

Auto-focus mechanisms work by making assumptions about what is most important in your frame. Things that are bright or moving tend to be interpreted as important. In many cases, this is fine, but if your subject is standing in front of a lake with boats sailing by, for example, the camera has a hard time deciding whether you're trying to shoot the static subject or the moving sailboats. Often the camera becomes confused and continually refocuses on different objects. In most situations, you're better off using the manual focus option if your camera offers one.

Focusing your camera manually is easy if you follow this simple procedure:

1. Zoom all the way in to your subject, and look at something with a lot of detail, such as the eyebrows or hairline.

2. Adjust the focus until it's as sharp as possible.

3. Zoom back out to your original shot composition.


That's it. Provided your subjects don't move too much, they'll stay in focus. If they do move, or if you decide to change the camera position, remember to re-focus each time.

White balancing and exposure
Earlier in this blog, we discussed color, in particular how our brains compensate for the differences in colors under different kinds of light. Cameras attempt to do this, but it's usually a better idea to manually white balance your camera to make sure your color representation is accurate. Manually white balancing a camera is a simple procedure. The idea is to "show" the camera what the color white looks like under the existing light. Given this information, the camera can then adjust its internal circuitry to compensate for the light, and the resulting video image will have faithful color representation.

Jun 1, 2008

Light , Color (Basic Video Production Techniques)

Describing light is pretty hard — after all, physicists have been wrestling with this question for years. Talking in terms of how we perceive light is much easier, and that perception is determined by our eyes. Our eyes have two sets of receptor cells at the back of the eyeball that send information to the brain. Rods are sensitive to motion and light, but not sensitive to detail or color. Cones are more sensitive to color and detail.

Rods can operate at widely varying light levels, but cones require more light, which is why we can see at twilight, but things don't look as colorful. So if we want to record the highest possible video quality, with all the color information, we need enough light so that our cones will respond and relay the information to our brains. This is a fairly long-winded way of saying "use lights." The more light that's present, the more color information and detail we'll be able to perceive.

The amount of light in a video signal is referred to als luminance. The amount of color in a video signal is referred to as chrominance. So when we're working with light, whether we're recording it or manipulating it, we are working with luminance and chrominance. The tricky thing is that luminance and chrominance are intricately intertwined. If you add more luminance, the chrominance is affected. Think about adjusting your television set or your computer monitor. When you turn up the brightness control, colors appear brighter, which may or may not be what you want.

Color
Color is very subjective. We can never truly know how someone else perceives color, but our eyes are constantly adjusting to colors depending on the amount of light available. For example, if someone is wearing a red shirt, his shirt looks red whether he's outdoors in the sunlight or indoors under fluorescent lights. The quality of light that is being reflected off his shirt is completely different in these two situations, but our eyes adjust, and we see the shirt as red.

In a following section, you learn that cameras attempt to do the same thing, but they often need a little help. Making sure your camera is recording color information correctly is known as white balancing your camera. You must white balance your camera, preferably before every shoot, and every time your lighting situation changes.

Using lights

Many cameras are sold on their ability to shoot in low-level lighting situations. Although this may be okay for a home movie, if you're trying to create a broadcast-quality podcast, you need some lights. Shooting with the proper amount of light adds color and detail to your presentation, making it look higher quality. Also, when you encode your video into a podcasting format, you'll find that the higher quality your original is, the higher quality the resultant podcast is.

Discussing the finer points of lighting video is far beyond the scope. Many good books are available on the subject, as well as plenty of lighting professionals who are looking for work. But in the interest of giving you a firm understanding of lighting basics, we discuss the basis for virtually all lighting schemes, which is known as three-point lighting.

Three-point lighting
Three-point lighting is a simple technique that uses three lights to achieve a satisfactory lighting effect. These lights are known as the key, fill, and back lights. Each fulfills a specific purpose:

- The key light is the main light source for the scene.

- The fill light is the secondary light source and fills in the harsh shadows created by the key light.

- The back light is used to separate the subject from the background, by highlighting the shoulder and hair line.

For a simple illustration of three-point lighting, take a look at the three photos in Figure 1.


Figure 1: Three-point lighting in action: a) key light only; b) key light and fill light; c) key, fill, and back light.


In Figure 1a, we see the subject as lit by a single light. We can see the subject, but the left side of the subject is almost completely in shadow. To remedy this, we add the fill light, to fill in the shadows created by the key light (as shown in Figure 1b). The fill light remedies the problem with the shadows we had with a single light source, but the image is very flat. The subject blends into the background, creating a two-dimensional, lifeless image. To remedy this, we add the back light (as shown in Figure 1c). With the back light added, we now see the subject's hair line, as well as highlights on both shoulders. This helps separate the subject from the background and gives us a much more three-dimensional image.

Placement of the three lights is fairly straight forward, as illustrated in Figure 2. The key and fill lights are placed in front of the subject, on either side of the camera. They are usually slightly above the subject, pointing down slightly. The back light is obviously behind the subject, to one side, and usually placed fairly high, aiming downward.


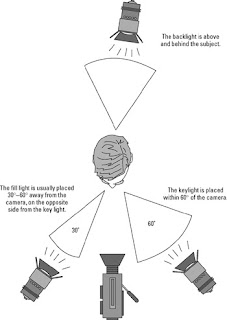
Figure 2: Positioning of lights using three-point lighting


One thing to bear in mind when setting up your lights is the quality of the light. Light sources can be hard or soft. Hard sources cast very strong shadows. For example, if you shine a flashlight against a wall in a dark room, the resultant beam has a defined round shape, with a very distinct edge. Anything in the path of this light creates a very distinct shadow. Soft light sources are more diffuse and cast softer shadows. For example, a lamp in your living room with a lampshade casts a very soft, diffuse light. The shadows cast by this kind of light are very soft and undefined.

In general, you want a relatively hard light source for your key light, a soft source for your fill light, and a very hard source for your back light. The shadows cast by the key light let people know what direction the light is coming from (which is important to our sense of depth) and are softened somewhat by the fill light. We don't want shadows from the fill light to be noticeable. We want the back light to be hard so we can pinpoint it where we need it. We don't want back light spilling all over the place.

Professional lights usually include a lever or dial that allows you to choose between hard or soft light. If you want to soften a hard light source, you can either put a diffusing material in front of it or bounce the light off something reflective. You can purchase attachments for your lights that change a light source from hard to soft.

Another thing to consider is how bright each light should be. The key light should be the brightest, because it's the main light source. The fill light should be lower wattage, so that it doesn't overpower the key light. The backlight should also be lower wattage than the key light. If your lights are all the same wattage, you can compensate by moving lights closer to or further away from your subject. A little adjustment can go a long way. For those of you who remember your physics classes, light falls off using the inverse square law, so double the distance equals one quarter the light.

Of course, in a situation where you have more than one subject, your lighting can be much more complex. You'll very likely need more than three lights. However, three-point lighting is still the basis of most lighting situations. You're always going to need a main (key) light source, fill lights to fill in shadows, and back lights to separate your subjects from the background.

Using reflectors (bounce boards)
One way to economize if you're stuck without enough lights is to reflect light from your key off what are commonly called bounce boards. Bounce boards can be as simple as a piece of light-colored cardboard to purpose-made reflectors that fold up into small, portable packages. Videographers usually travel with a couple of these in their arsenal because they're light and useful in lots of different situations.

This works quite simply. Instead of focusing the key light directly on the subject, you direct it slightly across the subject. Then you can reflect some of this light from a bounce board back toward the subject, as shown in Figure 3. Because the light is being reflected, it's automatically a diffuse source. It's also much lower intensity after being reflected, so it won't compete with the key light.


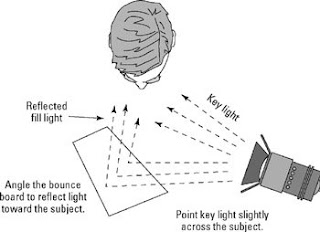
Figure 3: Using a bounce board to reflect key light back as a fill


This setup is commonly used in video news reel (VNR) situations. Interview teams often consist of a single reporter and a cameraperson, so traveling with a full three-point lighting kit is impractical. Instead, the cameraperson brings a single light on a stand and a bounce board, which may even be held by the interviewer while he's asking questions! It's cheap and portable, and quite possibly ideal for video podcasts.

Shooting outdoors
If you're shooting outdoors, the main problem is that you have no control over your key light, which by definition is the sun. You can't control how bright it will be, or how hard or soft. On a sunny day, it will be a very hard source. On an overcast day, sunlight is very diffuse. It's ironic, because everyone wants to take photographs on sunny days, but sunny days can be the most challenging situations in which to work.

Another problem with working outdoors is power. It's not like you can bring a lighting kit and plug it in wherever you want. You may have the option of battery-powered lights or a generator, but this starts to go beyond the scope of most video podcasts. What you'll most likely want to do is make judicious use of bounce boards to try to even out the lighting available to you. It also can be quite a bit easier to work out of the direct sunlight, and shoot your video in a shady area. You still get the warm quality of the sunlight, but without the harsh shadows that can be hard to overcome.