Showing posts with label example. Show all posts

Jan 17, 2009

Exporting MP3 audio from Audacity | Step by Step

Exporting MP3 files from Audacity is simple, if somewhat limited. You have to set your desired bit rate in the Preferences window before you export, because you aren't given an option to adjust settings when you export. Here's how to set your preferred bit rate:

1. Open Audacity, and open your podcast audio file.

2. From the Edit menu, choose Preferences, as shown in Figure 1. This opens the Audacity Preferences window.


Figure 1: Use this dialog box to configure Audacity's MP3 export settings.


3. Click the File Formats tab.

4. Select your desired bit rate from the bit rate drop-down menu in the MP3 Export Setup section.

5. Click OK.

After you set your bit rate in the Preferences window, choose the Export as MP3 option from the File menu. That's all there is to it. Audacity doesn't offer the ability to do mono MP3 encoding or VBR-based encoding. As long as you don't want to do anything fancy, Audacity is a perfectly good encoding option.

Jan 3, 2009

Step-by-Step Encoding Examples | Podcast

Now it's time to actually encode some files. This section demonstrates audio and video encoding using stand-alone encoders, editing platforms, and even iTunes. If your editing application isn't demonstrated, don't worry: It probably works much the same way. Let's start with iTunes, which really isn't an encoder, but it can do the job.

Tip You should always archive the high-quality version of your file so that you can re-edit or re-encode it later.


Encoding MP3 audio using iTunes
iTunes automatically encodes all imported audio. When you insert a CD and iTunes offers to import it, the audio bits are pulled straight off the CD and encoded into whatever format has been specified. The default setting is to encode using AAC. However, iTunes will also convert music in MP3 if you prefer, and will convert any file into an MP3 file. All you have to do is import the file into iTunes, and then convert it to MP3.

Setting MP3 encoding defaults

To use iTunes as an MP3 encoder, you have to set the default encoding to MP3. Follow these steps to set iTunes to import using the MP3 codec:

1. Open iTunes, and open the Preferences window by choosing Preferences from the iTunes menu (the Edit menu on a PC). You also can open this window using the keyboard shortcut Command+, (Ctrl+, on a PC).

2. Click the Advanced icon/tab, and select the Importing tab.

3. Select MP3 encoder from the Import Using drop-down menu.

4. Select your bit rate from the Setting menu. By default, the lowest setting offered is 128 kbps stereo. For most podcasts, this is a perfectly fine setting. If, however, you want to economize on your bit rate, you can adjust the settings by selecting Custom from the Setting drop-down menu.

5. Select a bit rate from the Stereo Bit Rate drop-down menu.

6. You can select a sample rate or leave this set to Auto. If your podcast ends up sounding a little crunchy or distorted, you can try lowering the sample rate to get better fidelity.

7. If you want a mono podcast, select Mono from the Channels drop-down menu.

Note If you select Mono encoding, the bit rate will be half of what you specified in the Stereo Bit Rate drop-down menu.


8. Click OK to close the Custom Settings menu, and then click OK to close the Preferences window. iTunes will now import files using the MP3 settings specified.

Importing and Encoding
To encode using iTunes, you must first import the file, and then convert the imported file. Importing couldn't be simpler:

1. From the File menu, choose Import.

2. Browse to find the file you want to encode, and click Choose (Open on PCs). The file is imported and is listed in your music library.

3. Find the file in your music library. Click it to select it, and then from the Advanced menu, choose Convert to MP3.


That's all there is to it! iTunes encodes it using the settings specified on the Importing tab of the Advanced menu. The iTunes music folder is easy enough to find, but if you want to encode to a specific location, you can change this setting in the General tab of the Advanced settings window.

Caution Be careful when you change your iTunes music folder; otherwise, you'll end up with your music library in two different folders. It's probably a good idea to change the music folder back to the default after you've finished your encoding.

Jun 6, 2008

White balancing: A step-by-step example


White balancing: A step-by-step example

You need a decent-sized piece of white cardboard to perform white balancing. Follow these steps:

1. Have your talent hold the white cardboard directly in front of her, where all the lights are focused. If it's a tight shot, she may have to hold it in front of her face.

2. Zoom in until the white card fills the entire shot.

3. Find your camera's white balance control, set it to manual, and then set the white balance. Most cameras have a button to push or a menu option to select.

4. Zoom back out, and behold your wonderfully balanced picture.


When your lighting situation changes, you should rebalance the camera. This is particularly important if you're combining footage shot outdoors with footage shot indoors. If your white balance is off, people's flesh tones shift slightly, as do the colors of their clothing (if they're wearing the same color). If you're unsure whether you should white balance, do it just to be sure.

White-balancing tricks
You can use non-white cards when white balancing your camera for a special effect. Non-white balancing cards come in two flavors: warm cards and cool cards. The process is exactly the same as detailed previously, but by using a non-white card to white balance, you can trick the camera into thinking white is something different, and the result is slightly skewed colors in your video.

Why would you want to do this? Well, warm cards have a slightly blue tint, and when the camera compensates for this, the result is a slightly warmer image. This may be appropriate for a very intimate podcast shot indoors, if you want to make the viewer feel cozy. Cool cards have a slightly orange tint, so the resulting image is slightly blue. You've seen the effect in car commercials or computer commercials, where you get a very cool, impersonal look. This may be appropriate for a technology video podcast.

The best way to find out what warm and cool cards do is to play around with them. If you don't want to shell out the money for the professional versions, you can try white balancing with different shades of cardboard purchased at a local art supply store. But be careful; if you want a subtle effect, you want cards that are every so slightly off-white.

Exposure
After you set the white balance, you have to set the exposure. Many cameras have automatic exposure circuitry. However, much like the auto-focus mechanisms discussed in the preceding section, this feature often can be more trouble than it's worth.

Automatic exposure, sometimes called auto-iris, determines the exposure by the amount of light coming into the lens. The problem is that the amount of light, particularly outdoors, is continually changing. While it may seem like a good idea to adjust the exposure, it's distracting when the exposure changes in the middle of a scene.

Going back to the sailboat example in the preceding section, a sailboat with a big white sail coming into a scene dramatically changes the amount of light coming into the lens. To compensate, the camera changes the exposure by closing the iris slightly, and the exposure on your subject is compromised. It looks like a cloud has passed in front of the sun, when all that has happened is that the camera has changed the exposure.

Manual exposure is always a better choice if your camera offers it. Setting exposure properly should be done with an exposure meter. Setting exposure can be highly subjective, as videographers regularly overexpose or underexpose for dramatic effect. The procedure for setting exposure manually depends on your camera, the shutter speed, whether you're using filters or not, and a number of other things. You should, however, be able to set your exposure manually by "feel."

Look at your subject, particularly flesh tones if you're filming a person. Do they look right? Try opening your iris to increase your exposure, or closing it a bit to reduce the exposure. Look critically, and make sure you have what you need. If you're unsure, it's better to underexpose than overexpose. You can always add a bit of brightness during editing.

Easy on the pans, tilts, and zooming

Similarly, you should try to avoid panning (moving the camera from side to side), tilting (tilting the camera up or down), and zooming in on or out from your subject. First, these camera techniques are used sparingly by the pros, so if you use them too often or inappropriately, they're a dead giveaway that an amateur is behind the camera. Second, they place lots of motion in the video frame and consequently degrade the quality of your final product.

Apr 27, 2008

Compression: A step-by-step example

Now that you know a little bit about how compression works, it's time to play around with it to see how it affects the sound of your podcast. For this example, we'll be using the compressor that comes with Audacity.

1. Open Audacity, and open your podcast file.

2. Select the entire file by pressing Ctrl-A (Opt-A on a Mac). Remember that Audacity doesn't expose the effects until you highlight a section of your audio.

3. Select Compressor from the Effect menu. This brings up the Dynamic Range Compressor window, as shown in Figure 1.


Figure 1: The Dynamic Range Compressor in Audacity


4. You can see in Figure 1 that the default settings for the Audacity Compressor is a 2:1 compression ratio, a -12dB threshold, and a .2 second attack time. (This plug-in doesn't have a release time setting.) In fact, this is a nice moderate setting that may work just fine for your content. However, you may want to experiment with the settings to see what changing the threshold, ratio, and attack times do to the sound of your file.

Audacity's Dynamic Range Compressor settings are adjustable in increments. For example, the ratios are variable in .5 increments (1.5:1, 2:1, 2.5:1, and so forth), and the attack times in tenths of seconds. Try changing the compression settings to a 4:1 ratio and a .1 second attack time. Preview the audio. Hear a difference?

In fact, 100 milliseconds is really too slow of an attack time. To hear why, try changing the threshold to something really low, say -30dB. Preview the audio. Hear that? The audio starts off loud, and 100 milliseconds later the compressor kicks in. The compression effect is audible, because the attack time is too slow. However, if you raise the threshold up to say -15dB, the effect may not be as audible. You should be able to find a threshold that works in conjunction with the sluggish attack time.

Apr 18, 2008

EQ: A step-by-step example

This section steps you through the EQ process, with both graphic and parametric EQ. We'll assume that this is a male voice track that needs a little bit of sparkle. We're trying to do the following:

- Add a bit of warmth to the bottom end.

- Add a little clarity to the midrange.

- Give the vocal a bit of air, a little extra shimmer.

We're going to assume that you're using a software equalizer, though there's no reason that this couldn't be done using a hardware EQ. Also, the frequencies we're choosing in this example may not be the best frequencies for your audio, although they're probably a good place to start. Remember: Use your ears:

1. First, roll off the extreme low end. Chances are good (unless you have an extremely deep voice) that there is no information down here, except for possibly some room noise. Let's roll off everything below 60Hz.

On a graphic EQ, push down the faders below 60Hz. If you have more than one, start off gradually, rolling off about 3dB at 60Hz and then increasing the roll-off with each lower frequency.

On a parametric EQ, choose a high-pass filter at 60Hz and roll it all off. Shelving EQ has gradual roll-off built in.

2. Listen to your audio. You shouldn't hear much of a difference, if any. That's fine. You may hear a slight clearing up of the sound, and if so, that's even better.

3. Next, work on the midrange, because it's the most important. To give a voiceover a slight lift, you can boost the upper mids in the 2 – 4KHz range.

On a graphic EQ, pick a frequency in this range and boost it significantly, say 6-10dB. Preview your audio. Return that frequency to no gain, and try boosting the frequencies on either side, previewing each time. When you find the frequency that sounds best for your content, boost it 3dB and then boost the frequencies on either side 1.5dB, so there's a nice gentle lift. Preview the audio, and make sure it sounds good.

On a parametric EQ, choose a narrow Q and boost a frequency in the 2 – 4KHz range. Preview your audio. Try moving the frequency setting up and down, until you find the right frequency. Preview the audio each time you change the frequency. After you settle on a frequency, widen your Q to approximately 1.5. Boost 3dB, and give your audio one last preview to make sure you're doing the right thing.

4. Now listen to the low mids. The low mids are roughly where the sounds "er" and "uh" live. (If you've ever seen a sound check before a live gig, you'll hear the audio engineer making these sounds in the mics to check the EQ.) These frequencies give our ears information about the size of a room. You can often clear up a mix by cutting here, but be careful: You can make your audio sound too thin if you cut too much.

On a graphic EQ, you can experiment with cutting around 300Hz. You can do the same on a parametric EQ, with the added benefit that you can make the Q very narrow, to avoid thinning out your mix too much. Be sure to preview your audio to make sure you're making it sound better and not too thin.

5. If you're worried about the bottom end of your audio, particularly after cutting a little at 300Hz, you can add some warmth by boosting the bottom end. We rolled off the extreme low end earlier, but those frequencies are generally inaudible on most systems. To add audible bottom end, you need to boost in the 80 – 200Hz region. Where you boost depends on what (or who) you're EQing. The bottom end of male voices is usually around 100Hz; female voices are closer to 200Hz.

On a graphic EQ, you can find and push the frequency you're looking for. You may want to push the frequencies on either side slightly, as well. And the same goes for parametric; find the frequency, choose a fairly wide Q, and boost a bit. Preview your audio.

6. Finally, you need to decide if your audio needs any final sparkle. You can add this by boosting your high frequencies ever so slightly.

On a graphic EQ, start lifting at around 5KHz and boost the frequencies above 3dB. On a parametric EQ, select 5KHz for your shelving frequency and boost 3dB. Preview your audio. If you're happy with the sound, apply it! You may want to save this as a preset if this is a setting you think you'll be able to reuse.

Figures 1a and 1b show the results of all the preceding steps using graphic and parametric EQ. Your results may be slightly different; in fact, they should be, because you're listening to something different!


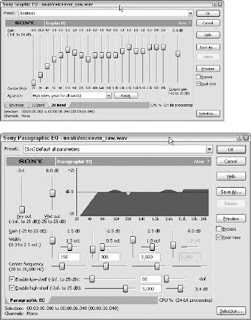
Figure 1: The results of the step-by-step example, illustrated on a) a graphic EQ and b) a parametric EQ.